Commons:Cleaning up interference with Fourier analysis
- For more about image cleanup in general, see Commons:Images for cleanup.
Interference or other regular patterns overlaid on an image can be introduced by a variety of sources, including:
- Halftoning;
- Electromagnetic interference in the environment of the device collecting the image;
- Noise in a transmitted image such as a television still due to analog transmission interference or degradation of media;
- The texture of the paper that the image was printed on, particularly if it was printed in a cheap magazine or newspaper.
Attempting to remove these by ordinary image space techniques such as replicating the pattern and subtracting it would be extremely difficult and unlikely to be completely successful. Sometimes interference can be hidden by downscaling or blurring, but this is rarely a satisfactory solution.
A simple and effective technique for dealing with these problems is to identify the interfering features in the power spectrum image produced by Fourier analysis, eliminate them, and convert back to image space. This tutorial shows how to do this using some widely available tools.
Tutorial for Photoshop[edit]

First, go to Alex V. Chirokov's Archive page and click the link labelled "Download new version of FFT/IFFT Photoshop plugin". Copy the files from the archive into your Photoshop plug-in directory. Start Photoshop.
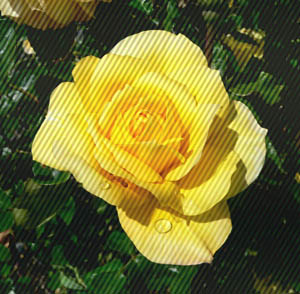
For our sample image, we'll be using this lovely photo of a rose which mysteriously became striped with an interfering pattern of diagonal lines (actually, I took Image:Rosa_Gold_Glow_2.jpg and added the interference myself).
First, we'll need to edit each channel separately (unless the image is grayscale or monochrome, then the manipulations can be done directly to the image). Click the "Channels" tab, and for each of the Red, Green, and Blue channels, select the channel, select all, copy its contents, and paste into a new image. Convert all three new images to RGB mode using Image→Mode→RGB color. Flatten all three new images (this is important - the resulting image will have distorted brightness/contrast if you don't do this).
On all three images, select Filter→Fourier Transform→FFT. Next, select one of the images and zoom it (it doesn't matter which one). You should see an image full of green and red noise, with a few bright spots in the red channel. We need to figure out exactly where all the bright spots are. Go to the channels tab and hide the Blue and Green channels to see the spots better. If it is still difficult to see them, select Layer→Duplicate Layer to duplicate the layer containing the FFT image, and click OK. Next, with the new layer selected, go to Image→Adjustments→Levels, switch to the Red channel, and drag the black (low) slider up until each of the bright spots in the image is clearly visible. (If you're curious about why the FFT images are so colorful, it's because it's encoding the phase shift, needed to later reverse the transformation, in the hue of each pixel.)

On the red channel, use a round, pure black brush of appropriate size to erase all of the bright spots except the one in the middle. Don't be afraid to erase too much of the area around a spot - it usually doesn't hurt anything as long as you're not too close to the center. In this sample image I spotted 8 bright spots, but there can be as few as 2. Copy this layer to a new channel on top of each of the other two images, making sure that it's lined up over the bright spots in all the images.
Finally, hide the middle layer (the one with the red channel adjusted) from view, choose Layer→Flatten Image, and say "OK" to the dialog telling you that hidden layers will be discarded. Make sure no bright spots are left other than the one in the middle. Flatten the other two images as well. Then, choose Filter→Fourier Transform→IFFT. You should observe greatly reduced interference in all three channels.

To recombine the channels, simply select the correct channel in the original image and copy the contents of the edited image over it using Select All, Copy, switch images, Paste. It may be necessary to adjust brightness/contrast. We now have a much nicer looking rose. It's not quite perfect though, being slightly blurrier than the original and having some subtler artifacts left over — it's always best to find a clean copy of the original image if possible.
Sometimes bright lines (nearly always vertical and horizontal) may appear instead of single spots. Also, sometimes a particular bright spot may correspond to a legitimate part of the image rather than a defect. Use trial and error and frequent conversions to and from image space to determine the right information to erase. Even though you will normally want to avoid editing near the central "axes", the bright spots might sometimes appear on them too. Remove the spots, but a bit more carefully.
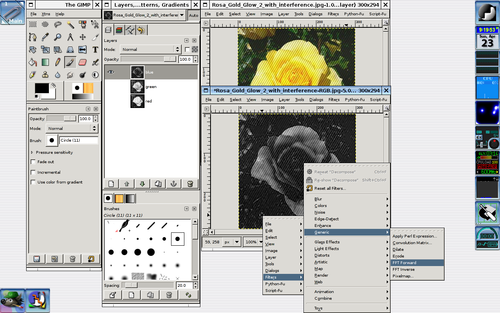
Tutorial for Gimp[edit]
First we have to install all the necessary software. All you need is available for free on Internet.
- Install Gimp, if you don't have it. Then, respective of your operating system:
Linux[edit]
You have to download and install:
- The gimptool utility: it should be within Gimp. Several Linux distributions put it in a different package. On Debian and Ubuntu it is called libgimp2.0-dev
- the fftw library: you can get it from www.fftw.org. It is available on Ubuntu and Debian repositories as fftw3 and fftw3-dev
- the Fourier Gimp plug-in, you can get it from https://www.lprp.fr/gimp_plugin_en/. There is no package for Debian/Ubuntu, you have to install it from the source.
Windows[edit]
- To install the Fourier Gimp plug-in download the "Binaries for Windows" from http://people.via.ecp.fr/~remi/soft/gimp/gimp_plugin_en.php3#fourier and extract its contents into the Gimp plug-ins directory (.gimp-2.x\plug-ins in your user directory or C:\Program Files\GIMP-2.x\lib\gimp\2.0\plug-ins).
- Restart Gimp, if it is running.


